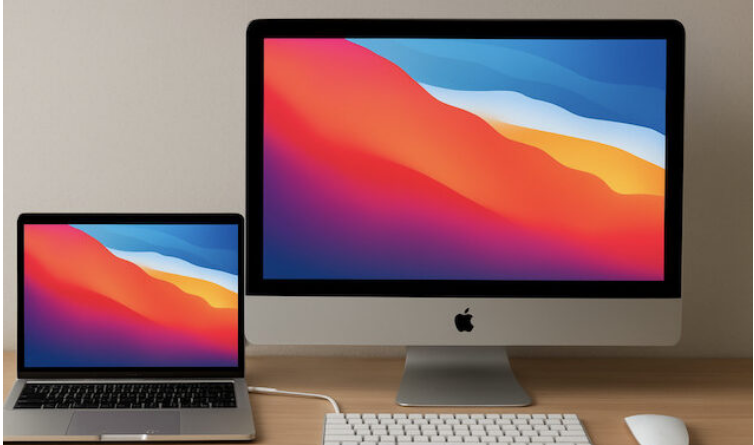
Apple’s iMacs boast stunning 4K and 5K Retina displays that should theoretically be perfect for use as external monitors with other Macs—think MacBooks, Mac Minis, or Mac Studios.
Unfortunately, though, Apple phased out Target Display Mode years ago. This means there’s no native way to use an iMac as an external monitor for another Mac anymore.
Thankfully, there are alternative methods, and one of the best for image quality is Luna Display. Whether you’re rocking a MacBook Pro, MacBook Air, Mac Studio, or Mac mini—including Apple Silicon models like the M1, M2, M3, and M4—Luna Display lets you turn your iMac into a true external monitor. It delivers full 4K or 5K resolution with barely any lag.
A quick note: We don’t recommend Luna Display for video editing, video playback, graphic design, or gaming. Technological limitations mean you’ll likely encounter pixelation with these graphics-heavy tasks. For those uses, a dedicated 5K monitor is better—ideally the Apple Studio Display, or a more budget-friendly alternative.
For most other external monitor needs, though, Luna Display is a fantastic little gadget. Below is a complete guide covering what Luna Display is, how it works, step-by-step setup instructions, and its potential drawbacks.
What Is Luna Display?
Luna Display is a compact hardware adapter created by Astropad, a company specializing in Apple software and accessories.
The adapter plugs directly into a Thunderbolt or USB-C port on your primary Mac. It lets you stream video and audio to your iMac via three options:
- Wi-Fi (for wireless flexibility)
- Thunderbolt/USB-C cable (for top-tier quality and near-zero lag)
- Ethernet (for the most stable wired connection—great for Mac Minis or with a Thunderbolt-to-Ethernet adapter)
Unlike Apple’s AirPlay or third-party apps like Duet Display, Luna Display is the only solution that supports full 4K and 5K Retina resolution. This makes it ideal for anyone wanting to maximize the iMac’s display capabilities.
Why Choose Luna Display Over AirPlay?
Apple’s built-in AirPlay can also mirror or extend your display to another Mac, but it has significant downsides. Here’s how the two stack up:
| Feature | Luna Display | AirPlay |
| Resolution | Full 4K & 5K Retina | Limited to 1080p (with compression) |
| Lag | Minimal (especially with a cable) | Noticeable |
| macOS Support | Works with macOS El Capitan (10.11+) | Requires macOS Monterey (12+) |
| Wired Option | Yes (Thunderbolt/USB-C or Ethernet) | No |
| External Display Role | Counts as a true external monitor | Often limited to mirroring |
As you can see, Luna Display is far superior to AirPlay if you need a sharp, color-accurate Retina display—whether for photo editing, design, or even casual use.
What You Need Before Starting
- Port Availability: Luna Display requires one Thunderbolt/USB-C port for the adapter. For best performance, use a second port to connect your iMac directly with a Thunderbolt/USB-C cable.
- External Display Limits: Some base-model Apple Silicon Macs (like the M1/M2 MacBook Air) only support one external display. If yours is one of these, Luna Display will use that single display slot when connected via Thunderbolt.
- macOS Updates: Since Luna Display is third-party, major macOS releases may require updates for compatibility. Apple’s AirPlay is less likely to break with system updates.
- Performance Expectations: Wired connections (Thunderbolt or Ethernet) offer the best image quality and lowest lag. Wi-Fi works, but it’s not ideal for graphics-heavy tasks.
Step-by-Step: Setting Up Luna Display
Follow these steps to connect your iMac as a second monitor with Luna Display.
1. Plug In the Luna Display Adapter
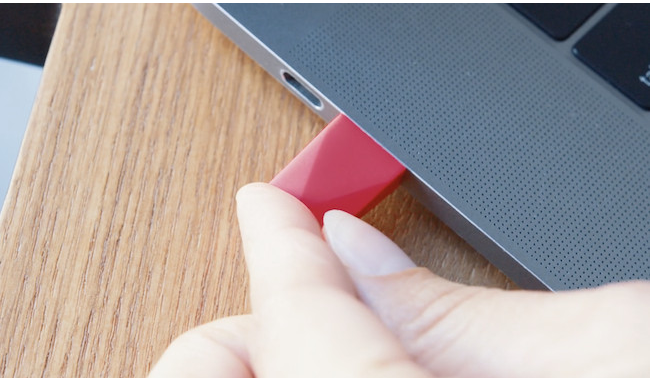
Insert the Luna Display adapter into a Thunderbolt or USB-C port on your primary Mac (the one you’re using as the source device). If you’re using a Mac Mini, you can also connect via Ethernet for even lower latency.
2. Install the Luna Display Apps
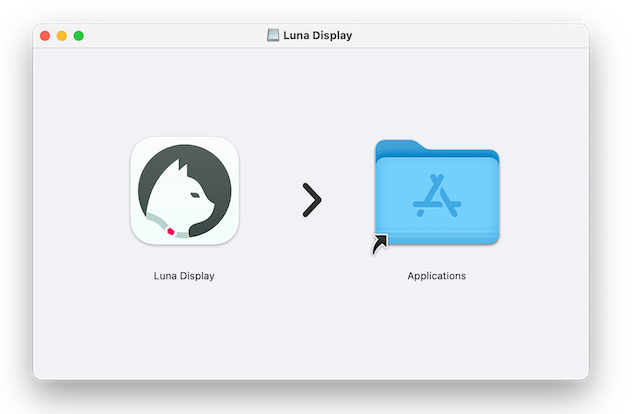
- On your primary Mac, download the Luna Primary app.
- On your iMac, download the Luna Secondary app (for Mac-to-Mac mode).
- Drag both apps into your Applications folder.
3. Set Up the Primary Mac
- Open the Luna Display app on your main Mac.
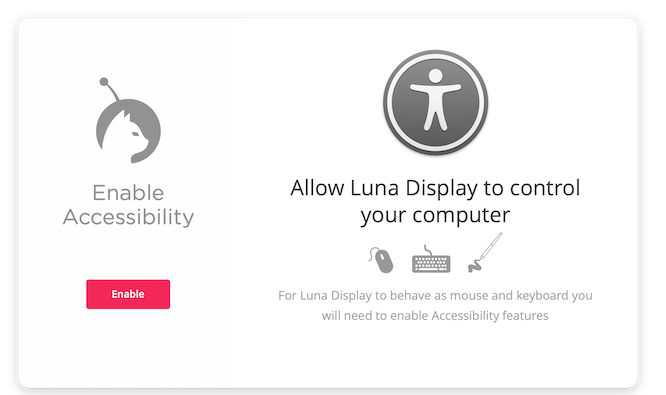
- When prompted, click “Enable Accessibility,” open System Settings, and enter your admin password to allow screen sharing.
- Click “Next” once permissions are approved.
4. Set Up the iMac (Secondary Device)
- Launch the Luna Display app on your iMac.
- Click “Setup” and grant any required permissions.
- You’ll also be asked if you want to use your iMac’s keyboard and mouse to control the primary Mac—this is optional but handy.
5. Connect the Two Macs
Once permissions are set on both devices, Luna will automatically detect your iMac and establish a connection.
For wired connections (Thunderbolt/USB-C or Ethernet), performance is nearly instant with Retina-quality resolution. Use a USB-C-to-USB-A cable for older iMacs, or a USB-C-to-USB-C cable for newer models.
6. Configure Display Settings
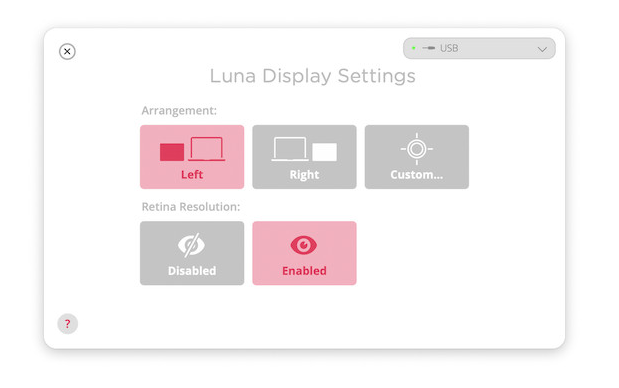
Open Luna Display Preferences (or macOS Display Settings) to:
- Arrange monitors (drag and drop to position the iMac relative to your primary Mac)
- Enable Retina resolution for crisp text and graphics
- Adjust scaling and color profiles to match your workflow
7. Disconnect When Done
To stop using the iMac as an external monitor, press the Escape (Esc) key on the iMac’s keyboard or quit the Luna Display app on both devices.
Tips for Optimal Performance
- Use a Thunderbolt Cable: For 4K/5K output, a direct Thunderbolt/USB-C connection delivers the sharpest image and lowest input lag.
- Ethernet for Mac Mini Users: Ethernet is a great alternative to Wi-Fi for stable performance. One minor annoyance: putting your Mac to sleep switches the Luna-Mac Mini connection back to Wi-Fi. Fix this by turning off Wi-Fi on your iMac—this forces the connection to use Ethernet.
- Close Background Apps: Quit unnecessary apps on both Macs to reduce latency.
- Keep Software Updated: Luna Display updates regularly to stay compatible with the latest macOS versions—make sure to install them.
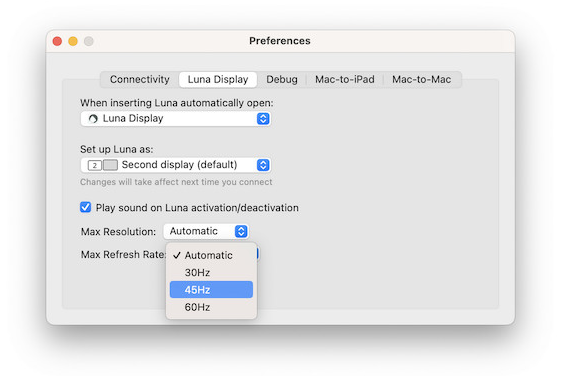
- Lower Resolution if Needed: If you see pixelation or stuttering, try lowering the resolution (it’s set to “Automatic” by default).
- Adjust Refresh Rate: If the image isn’t sharp enough, tweak the refresh rate (also set to “Automatic” by default).
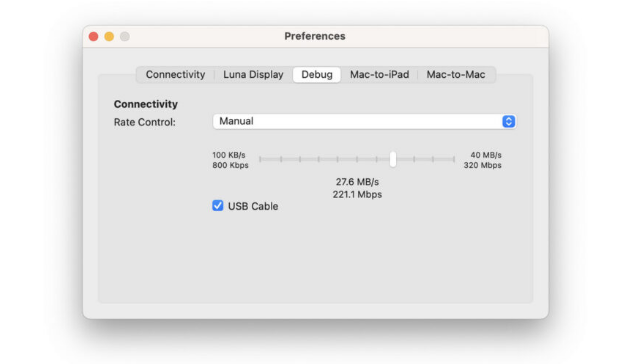
- Tweak Rate Control: For persistent display issues, adjust Rate Control (a manual bandwidth setting). Go to the Debug tab and slide the control up or down to adjust data transmission speed.
Luna Display’s Downsides
While Luna Display is the best way to repurpose an iMac as an external monitor, it has a few limitations:
- Cost: The adapter typically costs around $89.99 (£66.99), making it more expensive than software-only solutions. You may also need to buy a Thunderbolt or Ethernet cable separately.
- Latency: Even with a wired connection, there’s minimal lag—though it’s almost unnoticeable for most tasks.
- macOS Update Risks: Major macOS updates can disrupt third-party display tools. You may need to wait for Luna to release a compatibility update.
- Pixelation with Fast Motion: Luna Display isn’t great for fast-moving content (like video editing or gaming) due to how it transmits 5K resolution over USB.
- No iMac Webcam Support: You can’t use the iMac’s webcam through Luna Display.
- No Brightness Control: You can’t adjust the iMac’s brightness via Luna Display. Disconnect it first to change brightness, then reconnect.
- No Speaker Support: The iMac’s speakers won’t connect to your primary Mac through Luna Display.
- No MacBook Charging: Unlike most modern 5K Thunderbolt monitors, the iMac won’t charge your MacBook when connected via Luna Display. This can drain your MacBook’s battery quickly.
- Headless/User-Switching Issues: Some users report problems with “headless” setups (using the iMac as a secondary device without its own monitor) or when switching user accounts. Logging out or switching users on the iMac can break the Luna connection. Luna support offers workarounds (like scripts to restart the app), but these aren’t perfect and may require a reboot.
Summary
If you have an iMac with a beautiful 4K or 5K Retina display that you don’t want to waste, Luna Display is easily the top choice for unlocking its full resolution potential.
Its support for true Retina resolution, wired performance, and wide macOS compatibility make it far better than AirPlay or other software-only options. Whether you’re using a MacBook Pro, Mac Studio, or Mac Mini, Luna Display gives your iMac a second life as a stunning high-resolution external monitor.
That said, if 5K resolution isn’t a priority and you’re on a budget, there are other ways to use your iMac as an external monitor.