Want to transform your flat design into a dynamic 3D model? Converting your 2D floor plan PDF is a fantastic way to visualize, share, and refine your space. The best approach depends on your goal—whether it’s for a simple furniture layout, a virtual tour, construction documents, or getting accurate contractor quotes.
This guide will cover practical methods for all skill levels, from easy automated tools to professional software. We’ll also explore AI options, common troubleshooting tips, and how to export your final model.
At a Glance
Here are the top methods for converting a 2D PDF floor plan to 3D:
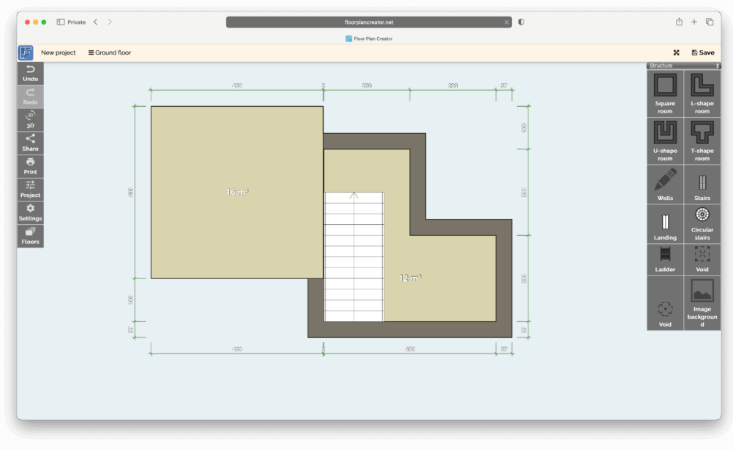
- Quick & Simple (Best for Beginners): Use home design apps that automatically interpret walls from your PDF. Great options include Planner 5D, Houzz Pro, Cedreo, or Floor Plan Creator. Ideal for visualization and interior layout planning.
- Accurate & Flexible (Intermediate Users): Import your PDF into programs like SketchUp or Sweet Home 3D. You’ll trace over the walls, extrude them, and add details manually for greater control.
- Professional & BIM-Capable (Advanced Users): Recreate the plan in Revit or AutoCAD, or use a LiDAR-powered app like MagicPlan on-site to capture real-world dimensions. This method generates Building Information Modeling (BIM) data suitable for construction. For high-end visuals, you can later import into rendering software like Blender or 3DS Max.
Preparing Your PDF
A little preparation goes a long way in ensuring a smooth conversion process:
- Check File Quality: If your PDF is a “vector” file (originally from CAD software), you can often export it directly to a DXF or DWG format. If it’s a “raster” file (a scanned image), export it as a high-resolution PNG or JPEG (300–600 DPI) to keep details sharp.
- Clean the Image: Crop out any white margins and remove notes or stamps that could confuse the conversion software. Use a simple tool like Preview or an editor like Photoshop or GIMP to rotate the plan so it’s level.
- Find a Reference Measurement: If the PDF doesn’t have a scale, find one real-world measurement (like a standard 36-inch door) to use for scaling later. This single step will save you a lot of time and frustration.
Option 1: AI & Automated Converters (Fastest Method)
Best for: Quickly generating a usable 3D model for visualization or rough planning.
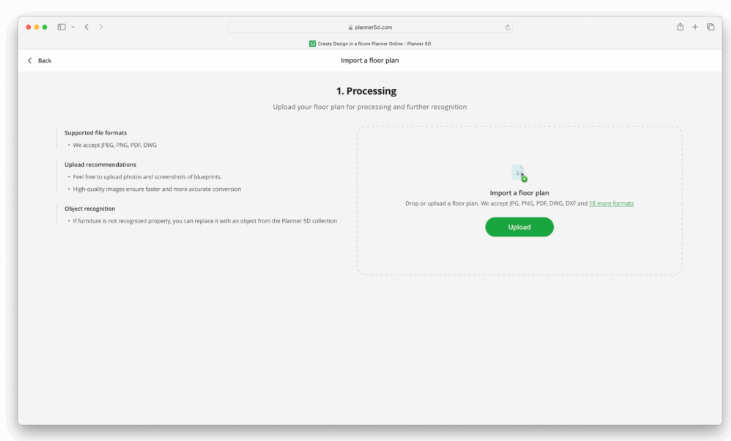
Recommended Tools: Planner 5D’s “Upload a Plan” feature is a great example. Similar services allow you to upload a JPG, PNG, or PDF, and their AI identifies walls to create an editable 3D scene.
Step-by-Step Guide
- Create an account in Planner 5D and start a New Project > Upload Floor Plan.
- Upload your prepared PDF or image file. Make sure it’s a single floor and within the file size limits.
- When prompted, provide your known reference measurement for accurate scaling.
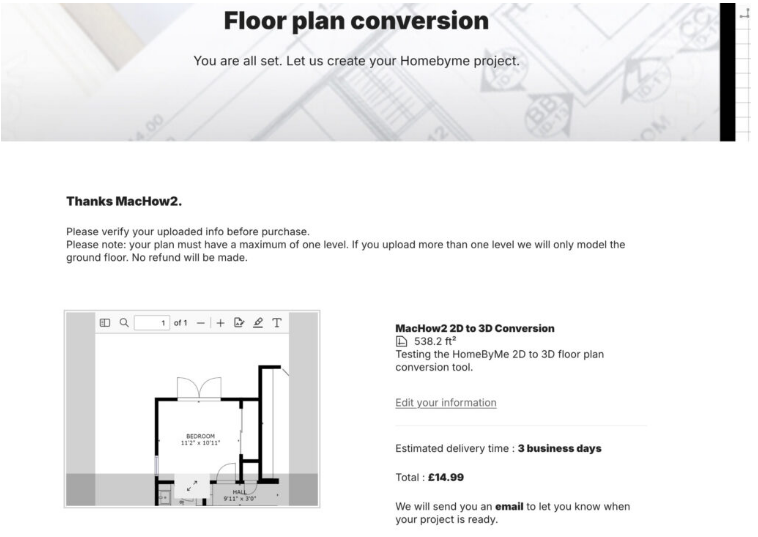
- The AI will scan the image and generate a wall-and-room skeleton, usually within minutes.
- Clean up the model: fix any missed walls, correct room labels, add doors and windows, and define ceiling heights.
- Switch to 3D view to furnish and decorate your model. You can then export screenshots, 3D tours, or model files.
Pros:
- Extremely fast and user-friendly.
- Excellent for client presentations and marketing visuals.
Cons:
- Can struggle with faint lines, complex symbols, or multi-story plans.
- Offers less precision and control than manual methods.
- Typically requires a subscription or credit purchase.
Option 2: Manual Tracing & Modeling (Most Control)
Best for: Users who want accuracy and plan to refine the model for contractor use or high-quality rendering.
Recommended Tools: SketchUp (Free or Pro), Sweet Home 3D (Free), or Blender for advanced visualization.
SketchUp Step-by-Step
- Export your PDF page as a high-resolution PNG or JPEG.
- In SketchUp, go to File > Import, select your image, and import it as a reference image.
- Scale the image: Using the Tape Measure tool, click two points with a known distance. Type the real measurement and hit Enter, confirming the resize.
- Trace the walls: Use the Line and Rectangle tools to draw over the wall outlines on the image.
- Extrude into 3D: Use the Push/Pull tool to give the walls height (e.g., 9 feet) and thickness.
- Add details: Insert doors, windows, and furniture from SketchUp’s 3D Warehouse or create your own.
- Export: For high-quality renders, export the model as an .OBJ or .FBX file to use in a renderer like Blender.
Pro Tips:
- Work on a copy of the imported image and lock its layer to avoid moving it accidentally.
- Use groups and components for walls, doors, and furniture to keep your model organized.
- If you have a vector PDF, export it to DWG and import that into SketchUp Pro for more precise geometry.
Option 3: Mobile LiDAR Scanning (Best for Real-World Accuracy)

Best for: Capturing an existing space with high precision using a mobile device.
Recommended Tools: MagicPlan, RoomScan LiDAR, and other apps that use the LiDAR scanner on modern iPhones/iPads.
How It Works:
- Follow the in-app instructions to scan each room with your phone or tablet. LiDAR provides the best accuracy.
- The app generates a measured floor plan and a basic 3D model.
- Export the model in formats like .OBJ, .DXF, or .IFC for further refinement in SketchUp, Revit, or Blender.
- You can align this captured data with your original PDF plan if needed.
Note: This method is more accurate than guessing from a PDF, but you may need to correct areas where furniture or obstacles blocked the scanner.
Option 4: Professional CAD/BIM Software (Industry Standard)
Best for: Construction-level accuracy, generating material schedules, and creating full BIM models.
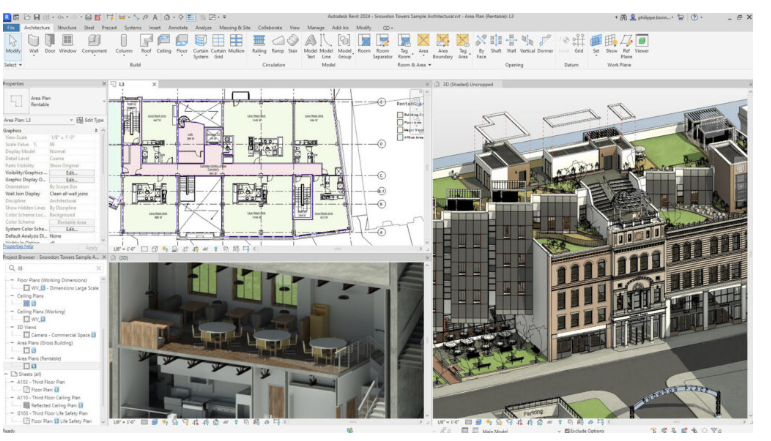
How It Works:
- If you have a vector PDF, use AutoCAD or a converter to change it to DWG, then import it into Revit or AutoCAD to build walls and levels.
- If you have a raster PDF, import it as an underlay and trace over it precisely using polylines and snaps.
- In Revit, you create walls from the lines, define wall types with real materials, place intelligent doors/windows, and automatically generate schedules and documentation.
The BIM Advantage: This workflow lets you extract data like square footage and material quantities, making it essential for real construction projects, not just visualization.
Choosing Your Export Format
Your choice of export format depends on your next step:
- Web & Realtime Viewers: .GLB, .GLTF, or .FBX files, or hosted 3D tours.
- 3D Rendering & Animation: .OBJ or .FBX are widely compatible.
- CAD & BIM Collaboration: .DWG, .DXF, or .IFC.
- Contractors & Printing: Export scaled 2D PDFs with dimensions directly from your modeling software.
Troubleshooting Common Issues
- AI misses walls: Clean your image to remove clutter and increase contrast before uploading.
- Wrong scale after import: Always use the Tape Measure tool (or equivalent) with one known dimension to rescale the plan.
- Broken or confusing lines: If the AI struggles with poor image quality, manual tracing is your best bet.
- Multiple floors on one page: Most automated tools require single-floor images. Split multi-story plans into separate files.
Final Recommendations
- For simple plans, automatic converters work remarkably well. For complex or messy scanned plans, expect to do some manual cleanup.
- For construction-grade accuracy, don’t rely solely on AI. Use on-site measurement (like LiDAR) or redraw the plan in professional CAD/BIM software.
- Experiment with multiple tools. Try uploading the same plan to an AI converter and also importing it into SketchUp to see which gives you a better starting point. The right tool will make your 3D transformation process efficient and successful.